
Showing posts with label Garage. Show all posts

Thursday, May 22, 2014

Rain Delay

So the plan for last weekend was two nights of camping at Noccalula Falls with another family that also has two girls. The first night was great, the facility was awesome and super kid friendly. We pitched the tents, made a fire, cooked burgers and made smores. All in all, it was a pretty great first camping experience for our kids.
Unfortunately two approaching storm systems would have made for a full day of rain and in the interest of not keeping four kids inside a tent all day we broke camp and headed home. We did decide to keep the weekend with our friends going and instead spent Saturday at their house.
Some time ago my buddy Jason bought the KZ650 that had been sitting in my garage. Since we had a cooler full of cold beer and a non-running bike that needed attention, our plans were pretty clear. He had already taken the carbs apart and started cleaning them. We used our time reassembling and adjusting them. Once we got everything together again the bike fired up first kick. They needed more adjustment but I was able to take the bike down the road before the day was out. There is still work needed to get the beast road worthy. I'm sure I'll see another day in his garage before all is said and done.

Thursday, April 17, 2014

Coil Bracket

The old one broke...
so I made a new one. Lost a little bit of riding time on Sunday but saved a little coin by using some scrap on the work bench. All in a day's work.

Tuesday, February 25, 2014

Parts Shelf

So the parts shelf is looking a little thin. A lot of stuff went out with the Shovel so now it is mostly Nightster take offs and mini-bike plastics. I need to unload all those old magazine back issues. I always keep them thinking I will flip back through them at some point but really they are just collecting dust. Maybe waiting for the last of winter to leave I can make some time to clean out the whole garage and get that shelf clear of garbage and in better order.

Tuesday, December 31, 2013

New Saddle


So you would think taking a seat off and putting a new one on would be an easy task. In most cases you would be right. As most Harley-Davidson motorcycle owners are likely to customize them, you would think the motor company would be kinder than to place a hurdle in the owner's path. In this case, it is the location of the ECM under the seat. This bike is an '08 and from what I have read, this location only lasted a few years. 
As you can see in the first photo, I trimmed the mounting points down to make it smaller and easier to conceal. Yes, those four little bits on each edge to make a difference. I also modified the plastic perch seen above. You'll need to do this if you are planning on running the stock fender as I was since (as we saw here) without it you'll have a gaping hole.
Parts of this hole (see red arrow above) would be seen running the Biltwell HB Seat if you did not trim and reinstall the plate. The ECM found a new home under the left sidecover and there is more gap between the frame but if you aren't OCD like me, you'll never notice. Small modification, wire relocation, etc are not the end of the world but for a new seat, it is more work than you want to do. 

Tuesday, December 17, 2013

Paint
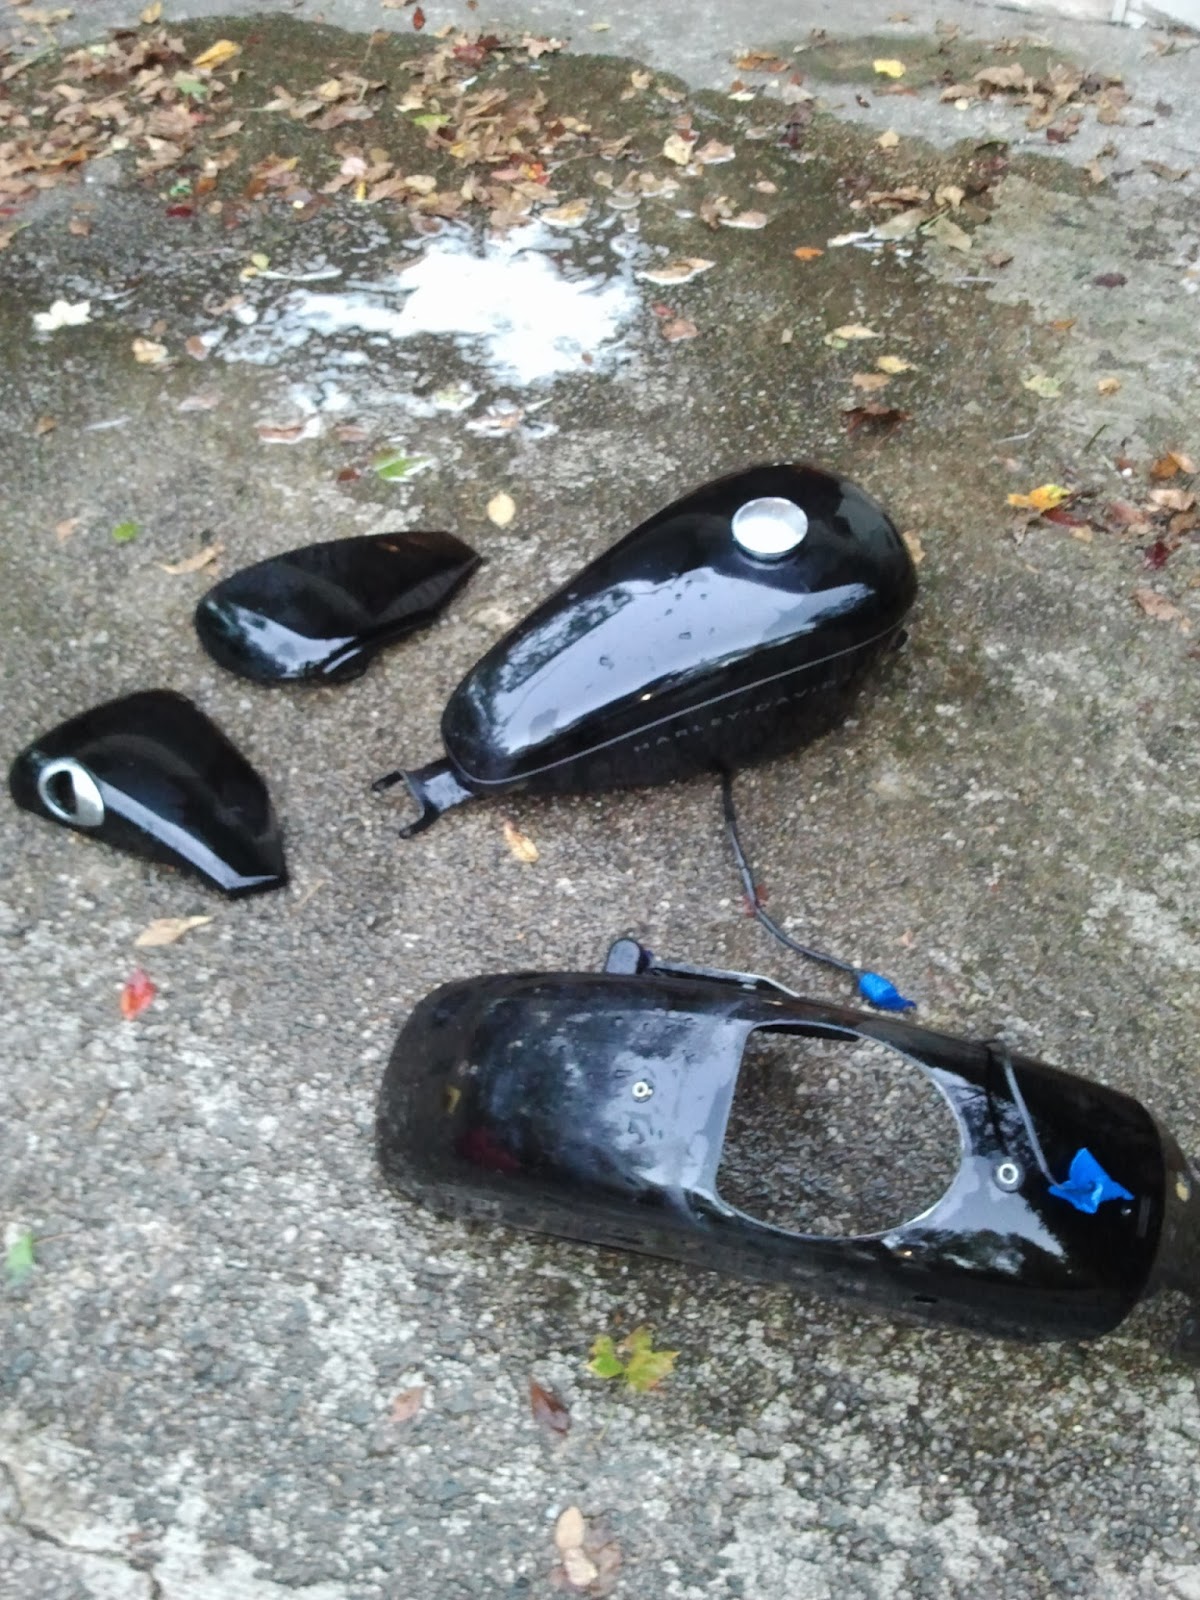
After dis-assembly, the first step was a good bath. See that giant hole in the rear fender? That is the stock location of the ECM. More on that later. After the bath I gave each piece a good sanding to promote adhesion. Then I took my rattle cans and started spraying. 
I always go a little overboard with coats. I put a lot on this time too. Chalkboard paint is excellent stuff and results in a very durable exterior. I've put it on the last two bikes I repainted. 
 
Notice anything missing...the rear fender maybe? More on that later too...
I know you can't tell from this flawless execution but I have no stencil experience. Used flat white, it was still wet in this photo. I am pretty happy with how it turned out.

Tuesday, December 10, 2013

Speedo Relocation

The original plan was to cut the factory housing down or even ditch it completely and relocate the idiot lights and just get a generic top clamp. Trouble is, modern bikes use modern electronics like LED lights and printed circuit boards. Separating them would have been a major undertaking. The stock housing idea just was not going to achieve a clean, finished look so I grabbed the above top clamp with integrated light housing from Joker Machine.
The speedo was moved down to the frame with an Auto Meter tach bracket. The loom around the wiring harness had to be split open a bit to stretch to the new location. Again, this is very simple stuff.

Tuesday, December 3, 2013

Handlebars

When I first bought my Sportster, the previous owner was running wide glide apes and the control wiring was run inside the bars. The base width created an overhang over the front end which always bothered me. I ordered some black narrow apes that were pre-drilled and dimpled so I could run the wires inside with them as well. 
Like always, I get a bit nervous about cutting the wiring harness at the quick disconnects and try and get the wires out of the connect blocks unsuccessfully. As has become my standard procedure when doing this operation, I cut the wires at the blocks and solder and crimp new pins into new blocks from an electronics store to maintain some semblance of factory operation.  

Soldering the pins on and the new blocks in white.
In addition to the new bars, I switched to a bar-end mirror on the left side and some Anderson grips. Much to the chagrin of a couple riding buddies, the hand tooled leather grips that have followed me over a couple bikes are not going back on this one. I just didn't feel like they fit the vibe I had in my head for these changes. I'm sure they will see use in the future but not on this bike.

Tuesday, November 26, 2013

Torn Down

Taking things apart is usually the easy step. Keeping everything together and remembering how it all goes back together is the hard part. After doing a few bike projects, you'll get pretty good at the ins and outs of it. Everyone has their tips and tricks. From painter's tape labeling to zip-lock bags, I have seen many different approaches and use a lot of them. At this point, I was just glad to have it all apart. Once I stepped back and looked at it, deciding where to start was kind of stressing me out. I was working on a self-imposed deadline trying to make a ride. I made my list and tried to attack it logically. This served me well. Again, there is more than one way to skin a cat.

Tuesday, November 19, 2013

After

Simple cosmetic changes, small on their own but together they make a pretty big difference. In the next few weeks I'll detail what all was done, from the easy to the fairly complex. I've gotta say, I am pretty stoked on the end result.

Tuesday, August 13, 2013

For Sale-'08 Harley-Davidson 1200 Nightster

So I am pushing back the start of the trip journal by one post to list my bike up for sale. 
'08 Harley-Davidson 1200 Nightster (Sportster).
Right under 20k on the clock. This has been a supremely reliable bike that has never let me down on the road, including a 9 day trek earlier this month.
3k on new rear tire, needs rear brake pads ($10 on ebay) and a 20k service. There is a dent in the top right of the gas tank. The bike has been, and is still, under warranty with HD.  
Lots of aftermarket goodies. Huge apes with internally wired electrics, fork brace with hand tooled leather top (still have fender), tank lift and wire tuck, relocated coil, quick detach sissy-bar, single tail-light conversion, stickers, etc. The fork bag and fuel sling ARE NOT included. More pics available upon request, just ask. Decided I want a different bike so this has to go. 
$6500.00
There is wiggle room in the price. Come with a serious offer and you'll do a little better. 
Click here for more info. 


Thursday, July 25, 2013

Saturday continued...

So Brandon is back in town and came to claim one of his trio of bikes from the garage. He isn't wasting any time getting back on the road and the CB he is taking needed a little carb work. It was leaking before he left and stopping that was the goal. It didn't quite happen before leaving here but before the end of the night, it was drip free.
Nick and Nick discussing something Shovel related.
The CB also got a new battery, some electrical work, a new clutch lever and clean gas. My Sportster got a new rear tire but as all four of us had a hand (or foot) on the tire at some point, there are no pictures. All in all is was a good, full day in the garage and Brandon's bike left under its own power before sundown. Safe travels, little CB. Hope you enjoyed your stay. 

Tuesday, July 23, 2013

Drunken Monkeys vs. Sprocket

     Saturday was a blast. There were three bikes getting attention, numerous beers being drank, slawburgers being consumed and enough wise-assery to go around. It started at eight am with a drum, sprocket and an obscenely large c-clamp. When a punch fails, bust out the drill and when setting rivets, start with the hammer first.
Pretty sure the new sprocket was overdue.
Tools of the trade and the finished product. More to come...

Thursday, May 30, 2013

Death Cart

     Nick got his hands on an old, beat up, inoperable Chinese scooter and stripped it down to nothing and brought it over to the garage so we could get it running again. It took a little more disassembly but we got it to run. It's a bit janky though...like turn the ignition with a screwdriver, bridge the solenoid, try not to kick the battery off the frame and no front or rear brakes janky. It also wanted to take right off without even the slightest touch of the throttle. It's actually a small miracle it didn't hit and domino the 6 bikes in the garage.
    Since it left Nick says he got a brake on it and got it to stay running for a bit and even rode it. I saw a video but I am pretty sure it was doctored with a little CGI. I'll believe it when that SOB is back here and I can wreck it in to something. Which needs to happen...soon.

Thursday, May 16, 2013

Last Saturday

Well lets just say this isn't how I wanted to spend it. Nick was in the house to help with a few other issues that needed attention and after, we were going to try and finish the reassembly on the Shovel clutch. I knew that I really needed to give the kicker cover some attention as I knew for certain that the mopar clip was missing from the clutch release lever allowing it to be pulled up out of the top. Again, not an expert but that ain't how its supposed to be.
Lets just say we put together the clutch with the new clutch tamer and...it didn't work. Yeah Wes, you called it: basically during the process of trying to remove the hub by tapping, we managed to knock the guts off the end of the clutch push rod. So...that attention that the kicker cover needed came sooner than I thought.
After draining the tranny and getting the cover off I found all the washers and clips which I will replace. I've got a new gasket already so at least that is easy. I also found out my oil slinger is no bueno and  the stop on my kicker gear was about to break off. This isn't what I wanted to find under the cover and definitely not when I wanted to do it but like I told Nick, much better to find this stuff out in the garage than on the road.  So...more parts are ordered and again we wait.


Tuesday, May 14, 2013

The Right Tools

It's pretty amazing, the things you can do with them. Clutch hub needed a little persuasion but came off in the end.
Got further and further down and finally to the mainshaft nut...and could twist it left and right with my fingers.
I'm not an expert but I know that's not right.
Another useful tool. Duo Seal Super Nut is on...and the saga continues.


Tuesday, May 7, 2013

Tank Art

While Nick's bike was here, I decided his plain old green tank needed a little love. 
We brainstormed for a bit before laying out the panels and then started trying to get all the bases covered. Here, you can see at the top we have the line squiggles and scales. 
Front left we did some freak, or as Nick likes to call them, polka dots. 
Added a desert landscape...
and a space scene.
For flair, we threw a little lettering on the top as well. 
Last but not least, we threw one of our new stickers on there so Nick can keep track of his progress. 
I'm not sure he was as excited about the art as I was. He said something about painting over it but I know he must be joking. 
If he did that, he would totally ruin his chances of selling it online 40 years from now for hundreds and hundreds of dollars...


Thursday, May 2, 2013

Rewiring The Wonder Shovel

     Idle hands do the Devil's work. Nick has had a little time to burn and to keep his head and hands busy, he's been trying to take the shovel where he wants it. In stripping things down, he realized there was a bunch of excess wiring, fuses and relays that needed gone. It was getting later in the afternoon so we moved from one shovel to the other.


After doing most of the reassembly on the top end, we proceeded on with several spools of colored wire and a couple pairs of snippers. I grabbed a simple wiring diagram from the excellent roadratroberts.com.If this site looks a bit dated by current standards, it is probably because it hasn't changed much since I first stumbled upon in in 2003. Anyhow, from B-movie reviews to killer old school photos to the rad drawn out photo wiring diagrams, this site is worth a look. The first time I saw wiring diagrams like this was here. 


      So we stripped off wires as we went and used the old pieces to judge the length we would need for the new pieces. One by one we made the new wires, added connectors as needed and put it all together. We tried to use some sort of consistency in the colors and Nick had done a good job of marking things when he did his initial tear-down. Cold beers in a hot garage on a Saturday night is a pretty great thing. It was getting late and somehow the idea of twisted yellow and blue wiring held together with green zip ties was too good to pass up. We're dumb and we laughed really hard about it.
     In the end, we hooked it up to the battery and an old switch I had lying around and held our breath. Low and behold, the headlight and tail light lit up and nothing caught on fire! The brake light even worked and everything. Nick was pretty excited as that hadn't been the case in quite some time. As the motor is still apart, we didn't get the satisfaction of hearing it run again but we made some solid advances in just half a day and barring other issues (fingers crossed) the bike should live again sooner than later.